|
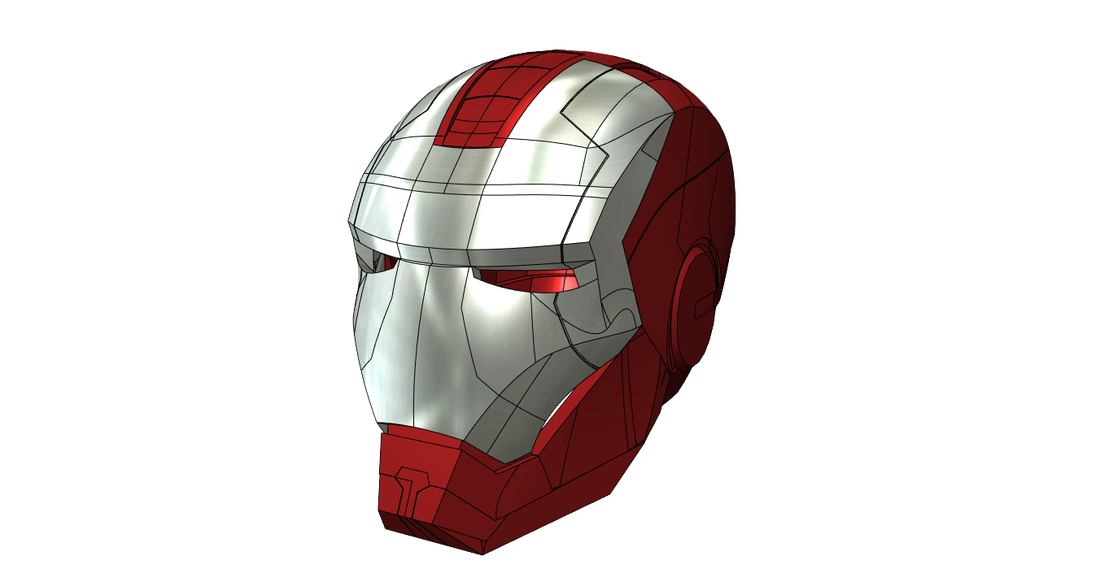
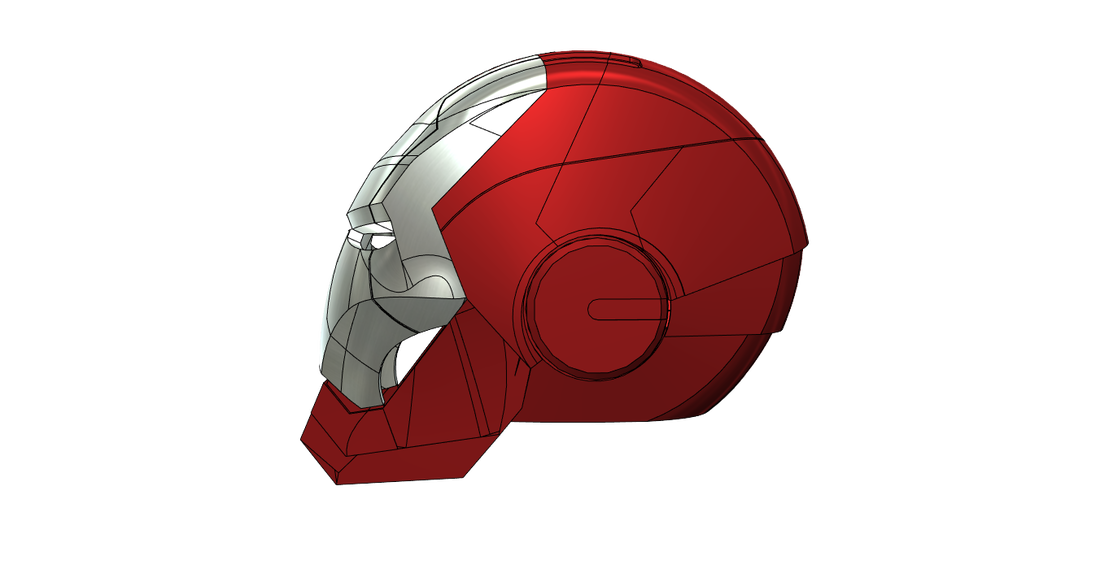
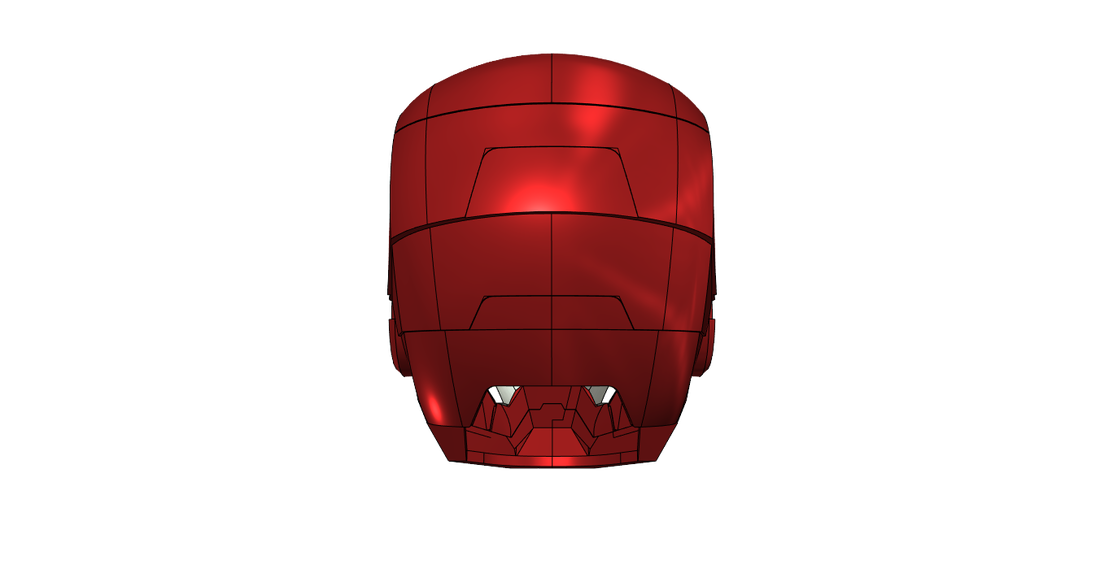
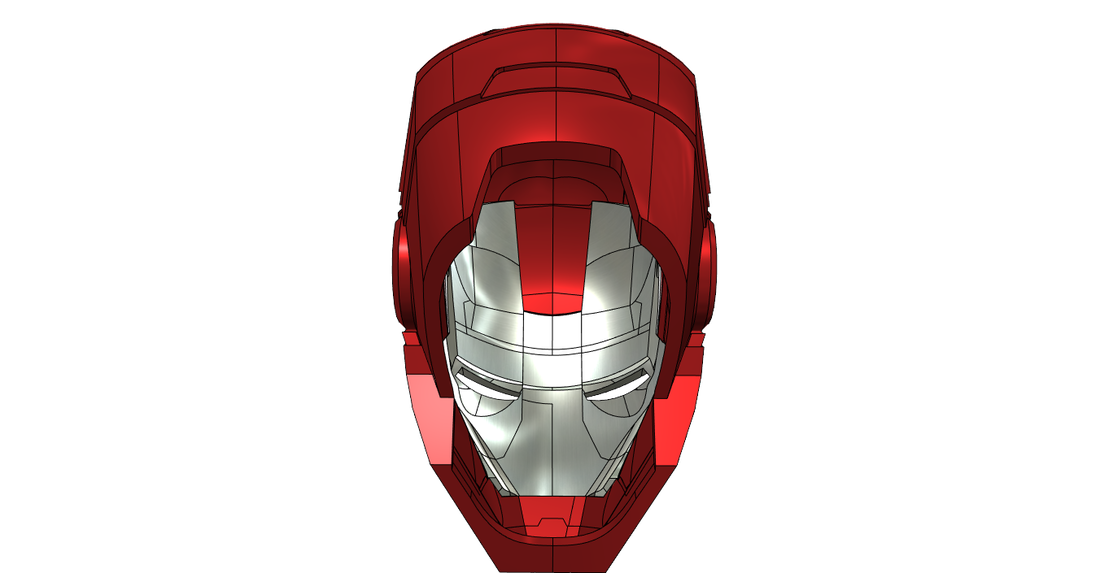
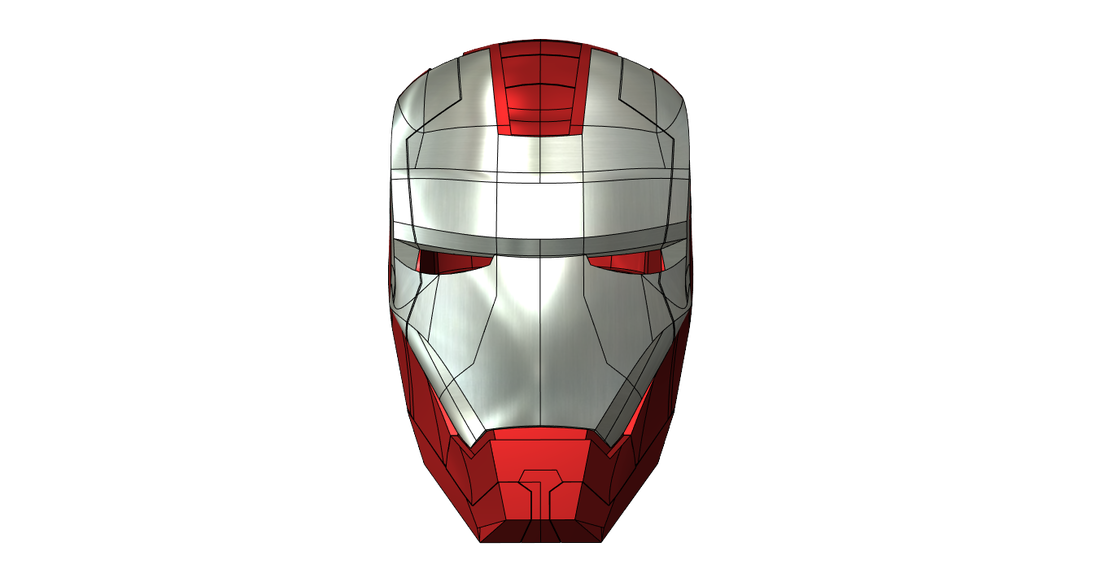
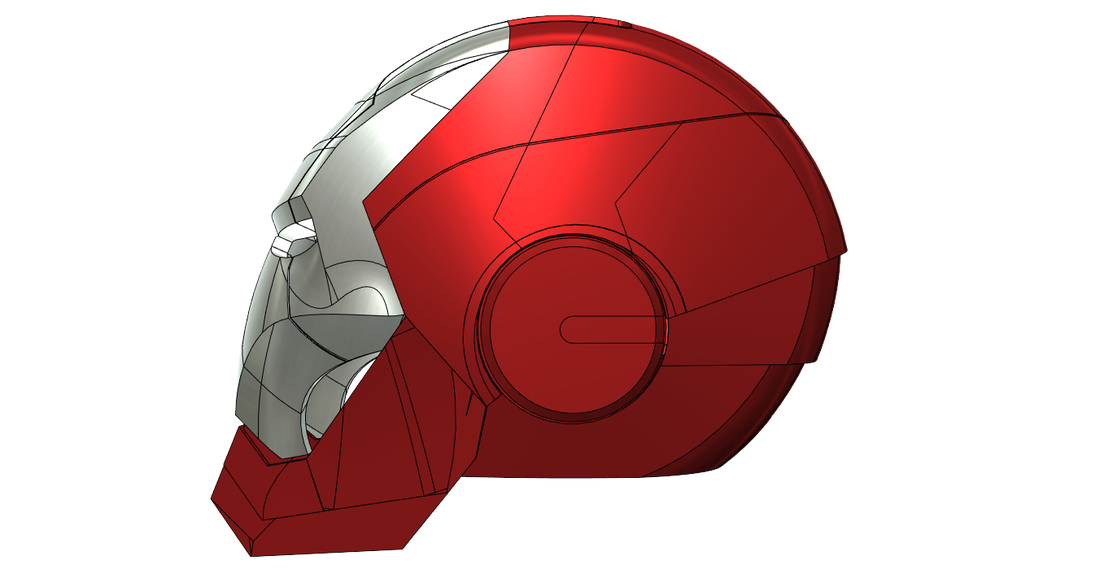
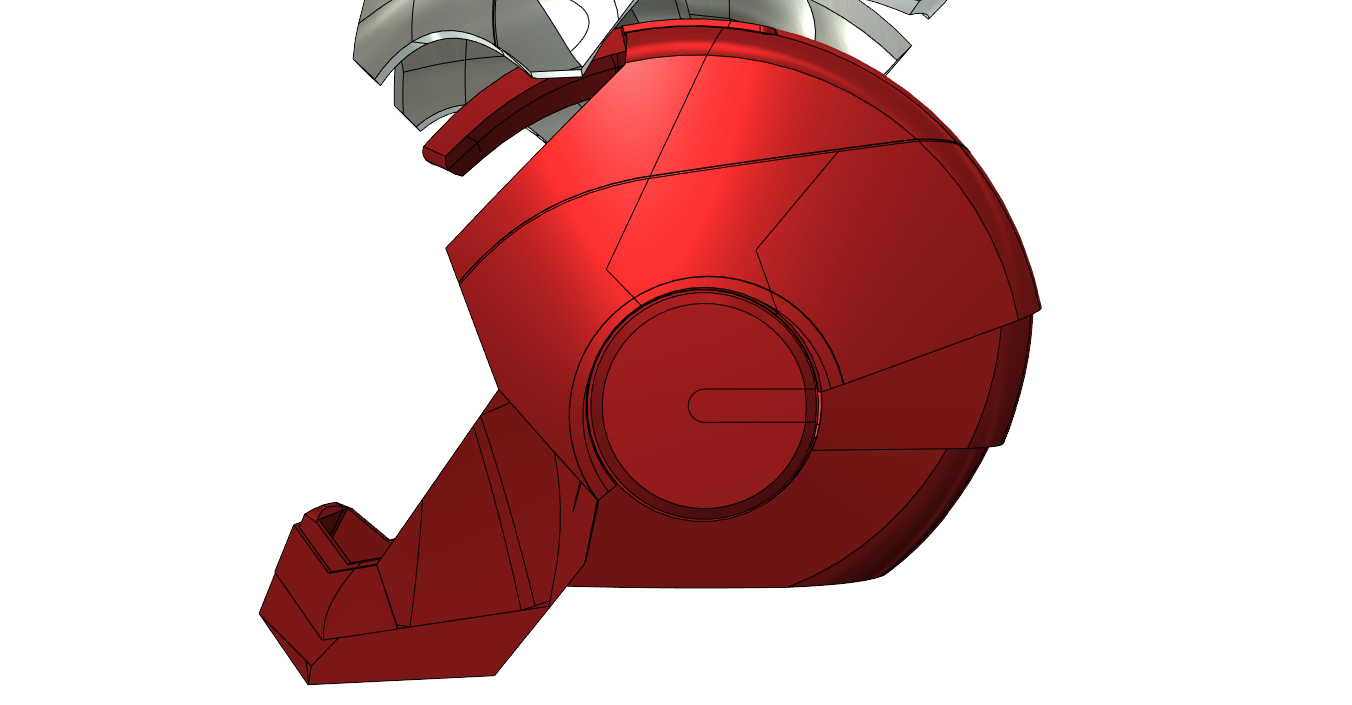
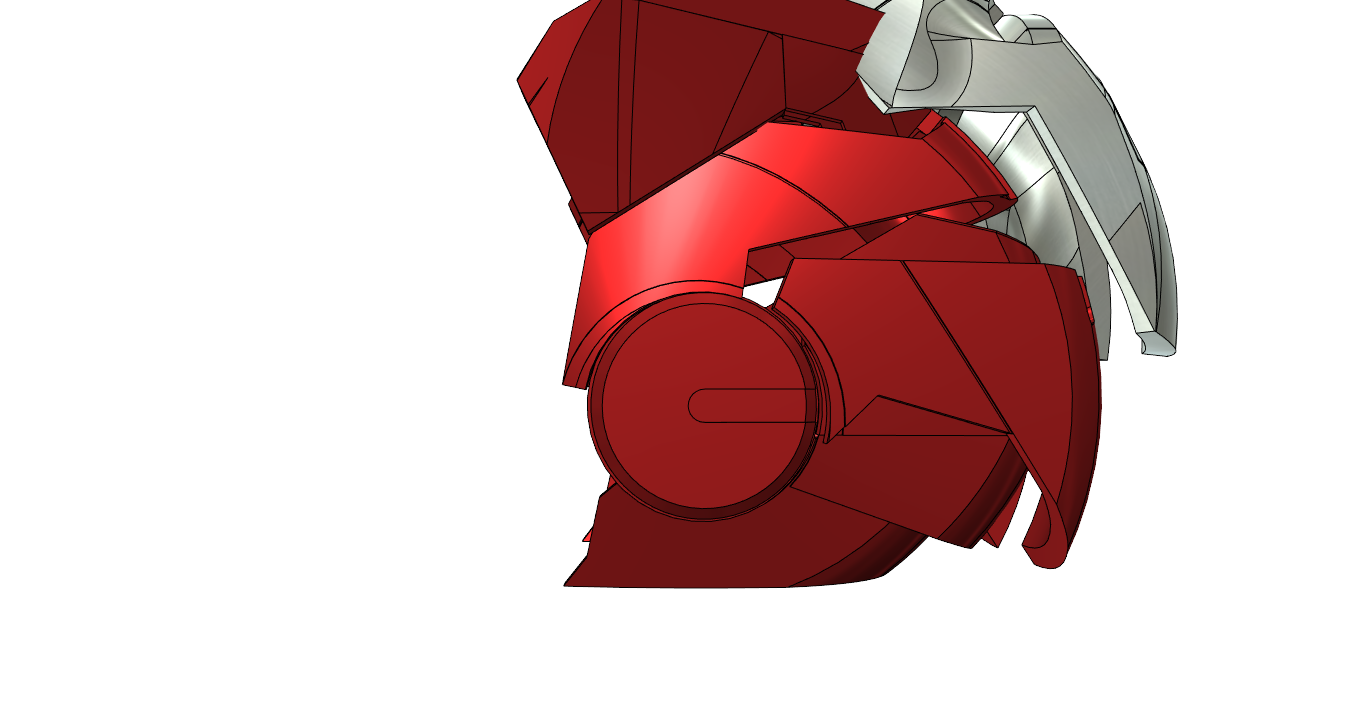
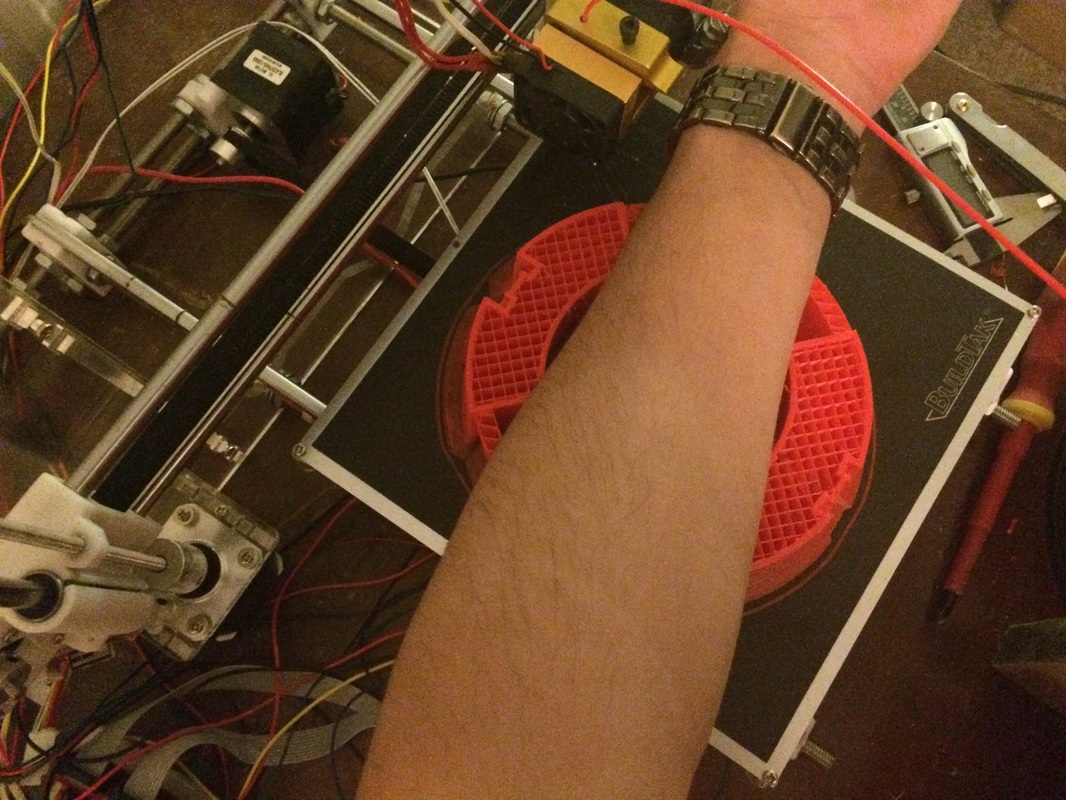
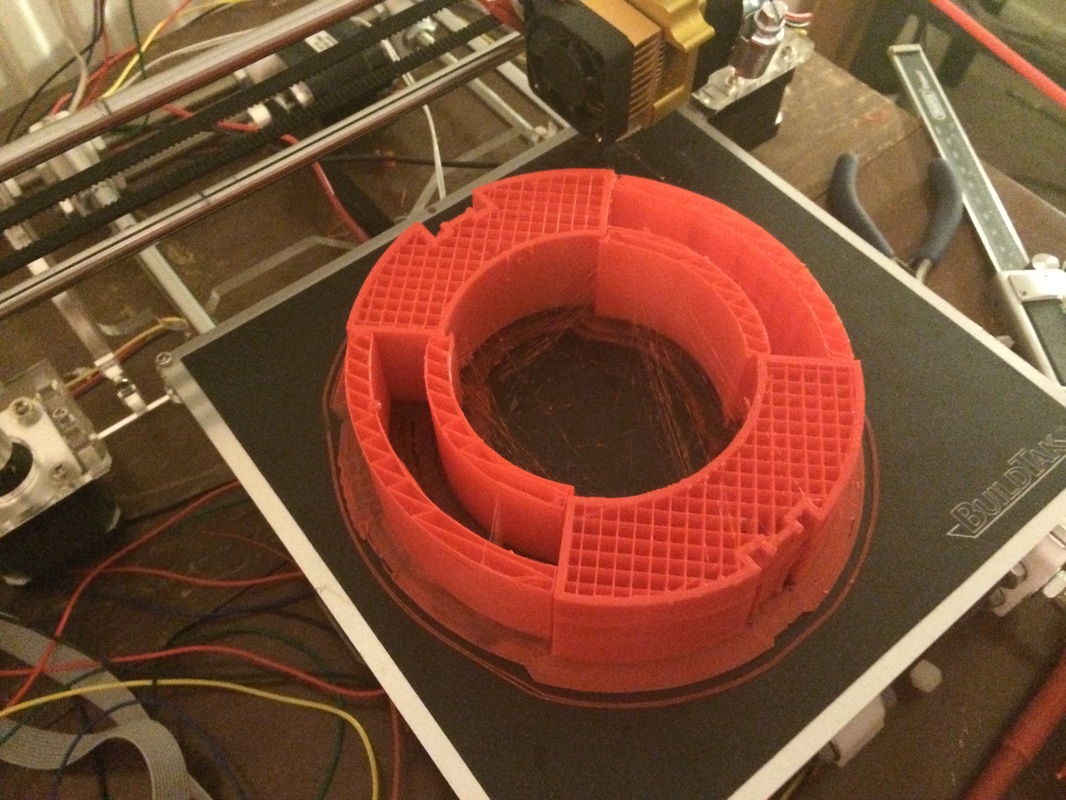
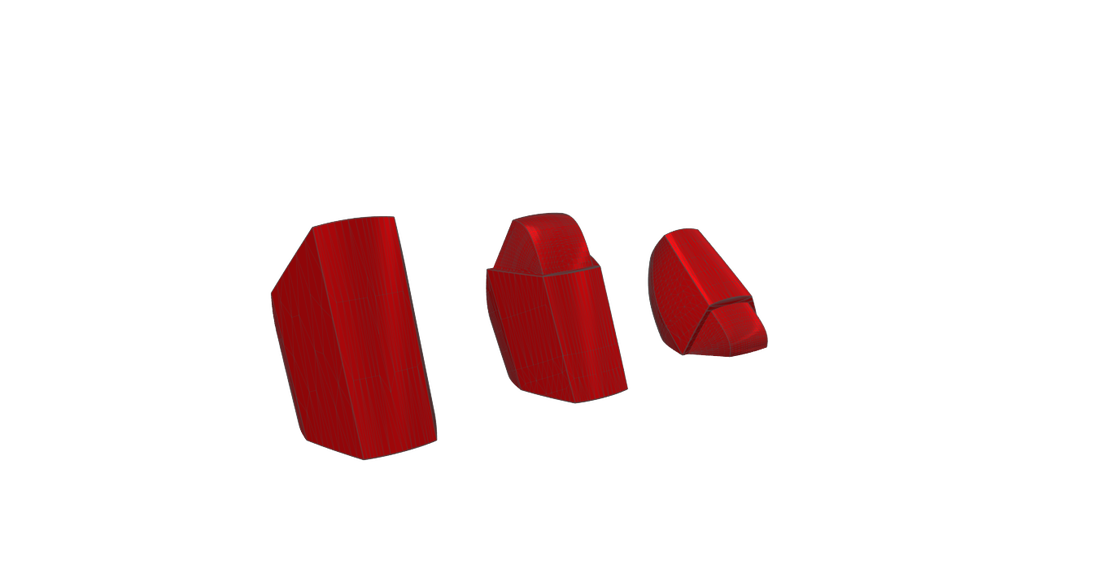
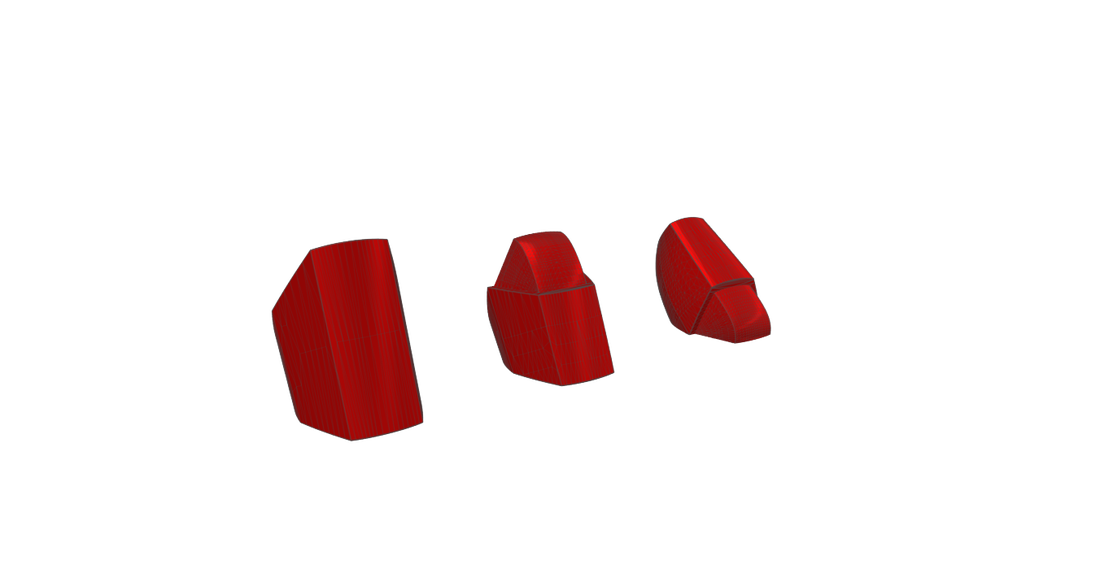
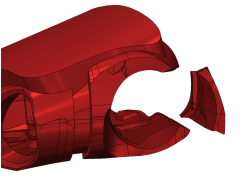
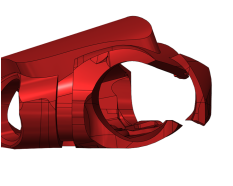
Hello everyone. It's been 2 months since my last post as I decided to skip August's post. The reason for this was because I felt there wasn't enough for me to talk about. Within the month all I had got done was some re-designs and by the end of the month, I realized some of those designs were going to be scrapped anyway! So here's this month's update that I'm please to show you how much my project has moved along. The helmet - I've started working on a new part!So the first new part of the suit I have worked on since starting this site is the helmet. My decision for working on this next was actually after I started working on the full upper body. As I had completed my arms (more on that later) I thought about applying those to the mannequin and to then work on the upper body. I originally planned to make the helmet last but the thing is, as I was designing how the upper body was going to work, I realised something. I have no idea how big the helmet is going to be when folded up so how am I meant to plan where it will slot into the back design. It hit me, I needed to completely design the helmet, the arms and the size of the hands before I could move onto any other part of the suit. Reason for this is I need to incorporate the helmet into the back when it folds up. This helmet was no easy task to design and it took me over 50 hours to complete. First, I created some basic squashed circular shaped and then cut apart the different levels for the stacking effect at the back. After adding in the ear bases I started carving the bottom of the jaw out of a new solid. From this point onwards I closely worked with sketches to cut up solids into the right kind of shapes. After creating the angled front and the tricky curved sides of the jaws I moved onto the faceplate. By this point I recon I would have spent about 15 hours working on the helmet so far. The face plate is mainly composed of a small part from the circular solid of the main helmet part and two more squashed circular solids. I worked these together with major work done by the fillet tool. Getting the right angles and seamless circular look of the faceplate was very tricky and took at least another 20 hours alone. Next I focused on adding the little details including indents and the ears before hollowing out the whole helmet. It was definitely a good idea to keep this step for last as it was so complex. This step took 10 hours of my life away just because of how many faces I dealt with whilst using the shell tool. After finalizing details I cut up the helmet into printable pieces. So many times have I been annoyed of my bed size being about 20x20x20cm instead of 30x30x30cm. If I did have that larger bed size I would be able to print, I think, all of my parts without splitting them up. Not much I can do about that. The only reason I got the whole helmet done within a month was that it was so damn fun to create and figure out. The first mechanism idea for the helmet was to have is fold up into a 'C' shape and slot into two holes in the back that would open up, but by the time I realesed how much I could really shrink the helmet design down to (which is still a 'C' shape just much taller than planned) I had to replan. In all honesty I don't know exactly how it will work still because I haven't returned to designing the upper body again yet. I could have it fold under that back, attack to one of the sides or maybe just stay at the back of the head. Who knows. The fact is, I have to do the helmet first. So going by the film the helmet basically curls out from the back... then magically the faceplate comes from nowhere. I'm pretty sure the lines in the faceplate and how it fitted together in the shot was just to make it look like it had unfolded from somewhere, hiding the fact it just appeared randomly from behind the head. What I have instead done with the faceplate (not final design but would be cool if it worked) was to divide it into three parts. The side two parts will hinge on the top and the middle part will spin around in the middle. This will shrink its size enough to fit behind the closed helmet as well as look awesome when unfolding. Also, in the movie the helmet is automated, but in reality I just can't do that with just how thin it really is. The plan is for me to pick up the helmet from my back, slide it onto the back of my head, then to grab hold of the ear pieces and turn them. I will have the front of the helmet directly attached to the ear pieces and for all the other parts behind to then be pulled out in series. It's kinda hard to explain so here is an image showing the stages of it unfolding: At this point I have completely finished the design and all I need to add are the mechanisms. I thought, before I do that, I should really test if it fits my head properly. That is why I have broken it down into 15 pieces to 3D print. I will then be assembling the helmet together as one solid part using dissolved ABS in Acetone as a solvent to glue the pieces. Currently, the helmet is being printed piece by piece, day by day, but because of how many pieces there are it will take quite some time until I can move on. Redesigning the suit - The armsSo, it was clear before I had to shrink the arms but really I just couldn't keep shrinking the same design I had. I made the decision to restart the arm file from scratch after I had broke down the lower arm into printable pieces and started printing. Quite quickly I realised just how thick it really is. Here's what it looked like:
The great thing was that now my arm is super simple and I know exactly how I want it to look as well as how I am going to get it to look that way. Only thing is, I haven't actually gotten very far with that. All I have right now is the following: a basic shell but with the bottom part widened to match up with the upper arm. What's nice about restarting this now is that I'll be able to fully straighten my arm. I have made the armour 1.3cm thick for both the bottom and the top parts of the arm which seems to be much better, but this means the 1.5cm thick elbow joints won't fit inside the design anymore. I have had them bought for quite some time now but they may still come in handy in the leg knee joints. By next month I hope to have the arms almost if not fully complete and print ready (at least for size testing without mechanics). This extra testing step is something I definitely need to do for each part of the suit. This may lead to duplicate parts but the test instances I have done so far have only shown how helpful they can be. An instance of this is with my current two palm test prints. Next month, look out for the arm to be mainly focused as the helmet will probably just be finished printing by then without much mechanism progress made. The 3D printer - Figuring out its limitsSo as described in the first post the current setup includes a Raspberry Pi B+ to control the 3D printer. This eliminates the need of hogging the laptop as I can't unplug it during print due to the broken 5V regulator of the Arduino Mega board within the printer. The pain of doing this way though was that whenever just clicking one button in the software for the printer to do something (like to head the bed) then it would take about 25 minutes to compute that. During this time the RAM would be in full use and nothing could be done in the meanwhile. By the time I could hit print it would have been over an hour. One great time saver I figured out was being able to control the printer via just knob and the LCD. This definitely sped up the setup time but I ran into an issue when printing the lower arm test print. The file for the lower arm was so large and complex that the RaspBerry Pi couldn't handle the load and every 10 minutes or so the printer would stop operating for about 30 seconds then it would carry on. Unfortunately, this caused weak layers to be produced within the print and cracks appeared that would just not do. I believe that happened because of the Raspberry Pi using up too much power and not being able to keep a stable power outage to the printer; The 3D printer is powered partially through the Raspberry Pi. Instead, I tried using my micro SD card in a SD card adapter but that didn't seem to be read. I still need to test if a normal SD card would work, but if not then I'll have to return to the laptop being hogged every time I print. Not ideal. In terms of the wires being untidy and all over the table... that's still the case. I should really get around to neatening up the cables and screwing the LCD onto the printer. Alternate designs - The fingersSo far the fingers are designed by me and seem fine, but about half a year ago these other Iron Man finger designs suddenly appeared. For some time I could only find design files of these fingers as purchasable files on a few sites. Finally the files are now available on the Autodesk 123D Design public library. When I found them I instantly downloaded them and checked them out. What's better about them is how there are fillers on the top of the fingers so when bent, you can't see through the gaps. Also, the design flows a lot better than mine, plus there is a larger thumb version (this being good because I currently haven't designed a thumb). still, I need to print them and test them out. Here's what they look like: Redesigning the suit - The new palm design improvementsSo I haven't really done a lot with the palm, being so busy with the helmet, but I'd like to mention what has been done. I have cut off the side of the palm where the thumb fits in. This cut is at two different angles (20 degrees apart) and also diagonally cut inwards. This is to enlarge the area of contact and also to lock the piece in one position. What I'm doing is creating a valley with the top and bottom angles crossing over each other. This should prevent the piece from moving forward and back and secure the whole thing together when it is on.
Another minor update I have made to the palms is how I have created models of the electronics I'll be using (the Lipo battery connected to a Adafruit Trinket Pro via the Adafruit Lipo backpack. These elements were positioned in the underside of the top cover in a way so that they will not go through the top and sit in line with the inside edge (to prevent poking into my hands). One electronic I haven't yet added a position inside the palms is for something new and remember that I haven't mentioned anything about the potentiometer yet. 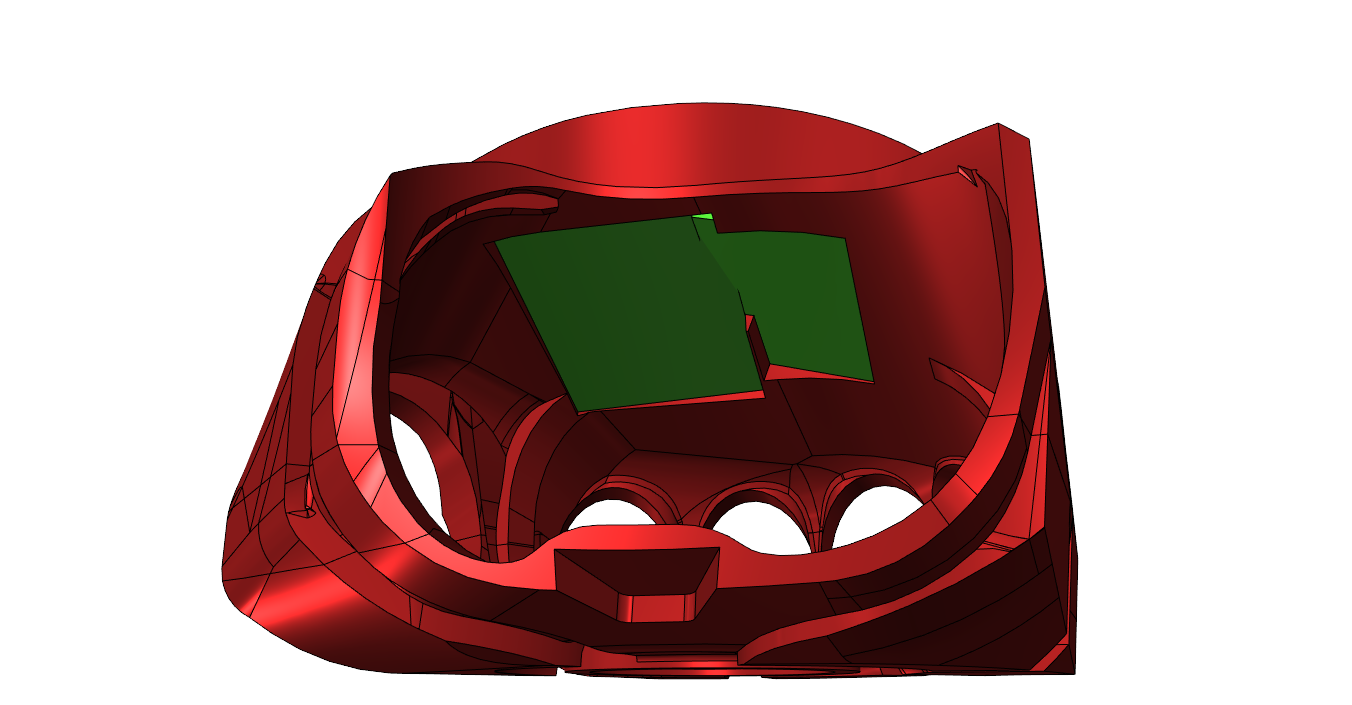 Designing mechanisms - The palm angle detection systemI have always not wanted a simple button press method for the palm repulsors as I wanted a gradual reading of my wrist angle. Sadly, I cannot fit a potentiometer into the hand without external casing, not to mention another system that connects to my arm. Last time I talked about having a piece that went on the underside of my arm. The idea was simple but I didn't take into account my hand bending forward. The whole system holding the potentiometer would have been very gimble like and to have that would be way too large, along with the potentiometer, it was impossible for a low-profile design. 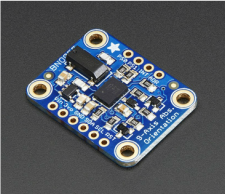 I watch James Bruton on youtube and I highly recommend looking him up. His projects are really inspiring for me and lately in his Ultron project (a stand alone robot with it's own AI) he used Inertial Measurement Units (IMUs) to measure the angle of his body parts. Next I thought, why not use them in my palm. They can be quite small so fitting them in shouldn't be too bad. I have 2 decisions. To either have one in the palm or to have one in the palm and another in the lower arm. With just one in the palm means the whole system will be just in the palm and no wires need to be extended anywhere but it mean that only when the palm is vertical to gravity will the firing sequence run. On the other hand, I would be able to measure the angle of my wrist by reading both IMUs at once and finding the different. This would mean I need to link the lower arm and the hand again which I would rather not do. One way I could do the second option is by having a sturdy cable casing. That would extend from the base of the palm and will hold the wires that lead to the other IMU which would also be inside the casing, on the end. That would probably be possible but I don't know how much space I'll have in my lower arm now with it's thickness only 1.4cm. I'll just have to complete my arms and first before working any more on the palms. Furthermore, because I haven't decided how the system works I haven't updated the code at all yet. The summaryThat wraps up this month's update post. Within the next month I will hopefully have a whole helmet to show off to people when they ask about the project, oh and also to test if it even fits right. While that is printed I'll be working on the arms and try to get them at the printing stage for next month. I'll play around with how the palms may work and see how the new fingers are as well. Also, did I mention I now have red gloves for the hands all put together including palms and fingers. Till next time.
-Cirtoyt
0 Comments
Leave a Reply. |
Author17 year old college kid who felt his course was too easy for him. Got bored one day and started making a real life iron man suit. Archives
June 2017
CategoriesBack to main site:
|